Friday, August 12, 2011

How to Make a Crochted Ball !!


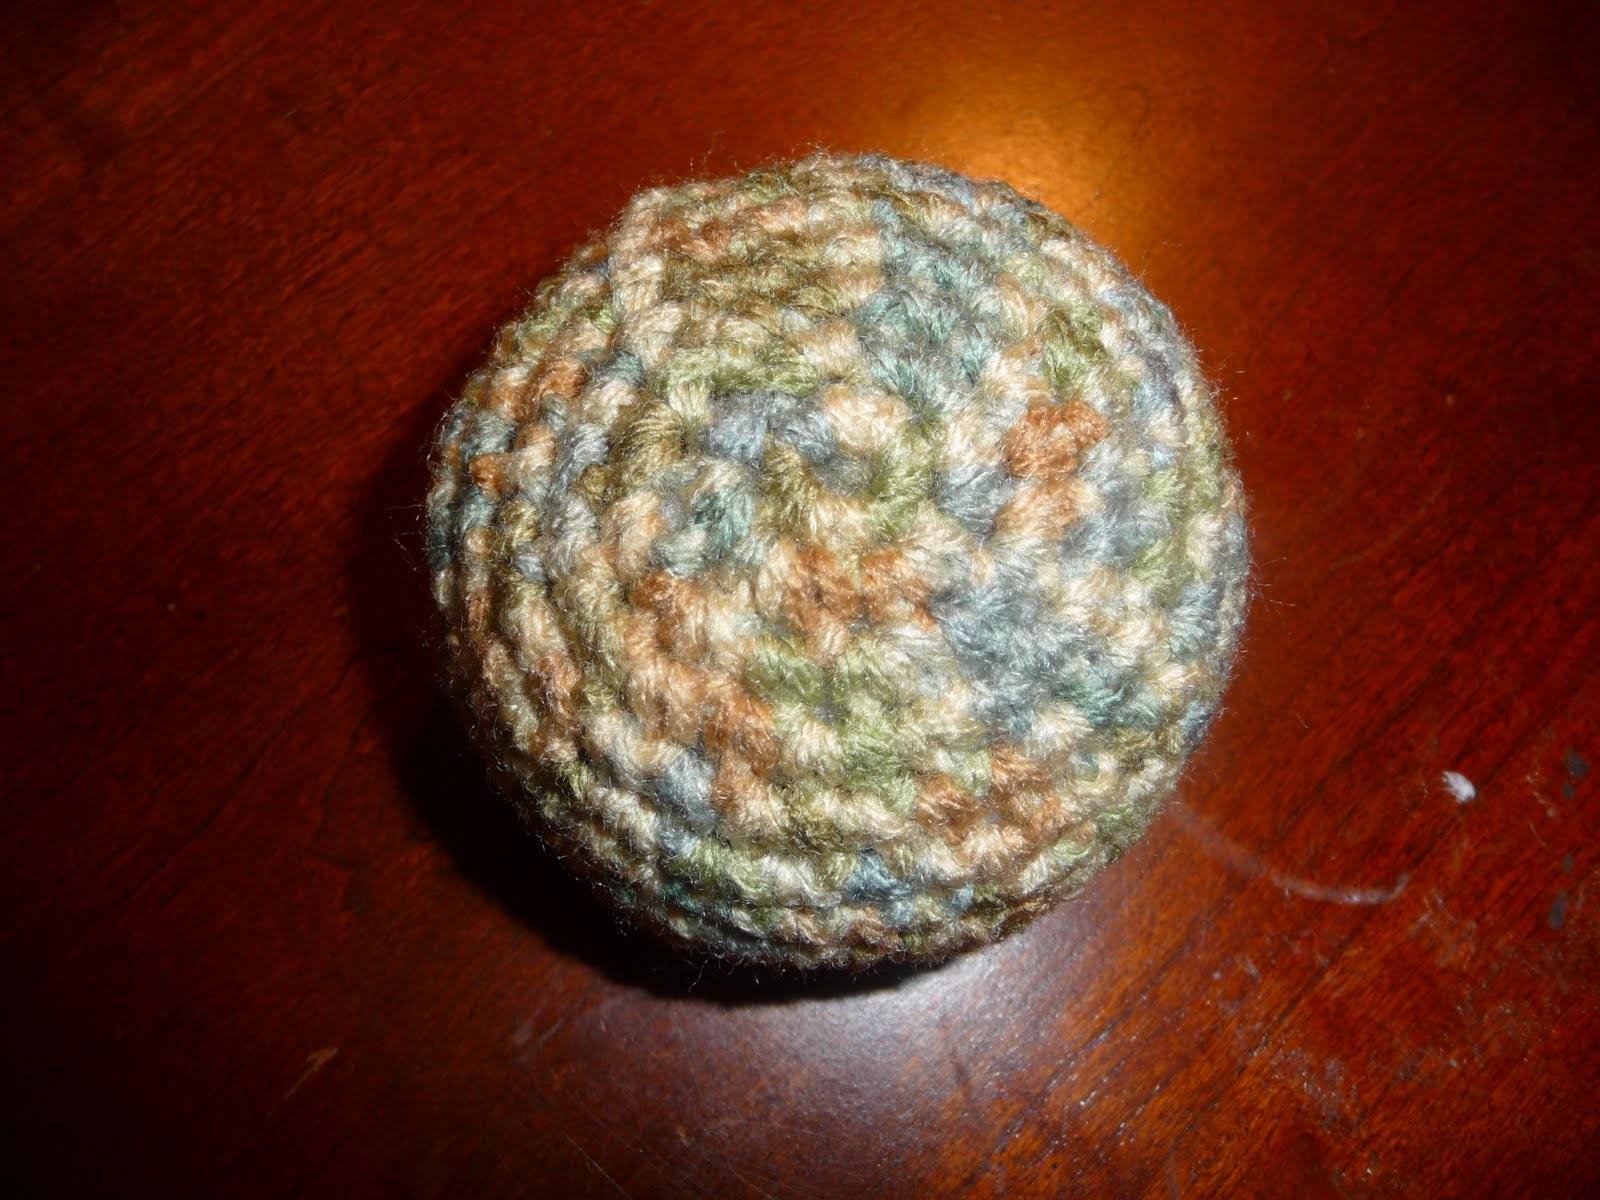
This Fun ball is a soft stuffed fun medium-sized ball. Good for entertaining a pet when you take him out in a walk, practicing your hackeysack skills, or using as a bodypart in a stuffed animal toy.
Basiclly you just play with it :)
Instructions:
Rnd 1:  ch 2, 6 Sc in the 2nd ch form the hook, join with a sl st. [6 sc]
Rnd 2 : ch 1,  2 sc in the same st you just joind to and on each st around , join with a sl st to the 1st sc. [12sc]
Rnd 3: ch1, 2 sc in the same st , * sc in the next st, 2 sc in the next st ; repeat from * around , join with a sl st to the 1st sc. [ 18 sc ]
Rnd 4: ch1, 2 sc in the same st you just joind, *sc in the next 2 st, 2 sc in the next st ; reapeat from * around, join with a sl st to the 1st st. [24 sc ]
Rnd 5 : ch1, 2 sc in the same st you just joined, * sc in the next 3 st, 2 sc in the next st; repeat from * around, join with sl st to the 1st st. [30 sc ].
Rnd 6 : ch1, 2 sc in the same st you just joined, * sc in the next 4 st, 2 sc in the next st; repeat from * around, join with sl st to the 1st st. [36 sc ].
Rnd 7 : ch1, 2 sc in the same st you just joined, * sc in the next 5 st, 2 sc in the next st; repeat from * around, join with sl st to the 1st st. [42sc ].
Rnd 8-10: ch1,  sc in the same st you just joined and in each sc around [42 sc ].
Rnd 11: ch1, decrease sc 2 together, * sc in the next 5 sc, sc2together ; repeat from * across [36sc ]
Rnd 12: ch1 , decrease sc 2 together, * sc in the next 4 sc,  sc2 together; repeat from * around [30 sc ]
Rnd 13 : ch1 , decrease sc 2 together, * sc in the next 3 sc, sc2together : repeat from* around [ 24 sc ]
Rnd 14 : ch1, decrease sc 2 together, * sc in the next 2 sc, sc2together ; repeat from * around [ 18 sc ]
Rnd 15: ch1, decrease sc 2together, * sc in the next st, sc2together; Repeat from * around [12 sc ]
Rnd 16:  ch1,decrease each 2 sc together all around , join with a sl st to the 1st sc ; Fastten Off leaving a long end for sewing,
Thread a yarn needle with the yarn end & weave it through the sts on rnd 16.
Pull the yarn tightly to close & make a knot to secure the yarn. Insert the needle inside the ball & push it out the other side. Cut the end and hide it inside the ball.
Shape the ball like you are making a snowball.

Tuesday, July 26, 2011

How to Knit a Cute Baby Sweater!!!

Purchase at My Store on Etsy

Instructions:

Body:
Cast on 60 sts.
Work in Garter st (k every row) until piece measures 4 1/2 in. from beg, end with a RS row.
Divide for Fronts and Back:
Next Row (WS):
K16 sts and place these sts on holder for Left Front; k28 sts and place these sts on holder for Back, k rem 16 sts for Right Front.
Right Front:
Continue in Garter st on Right Front sts only until Right Front measures 7 1/2 in. from beg, end with a WS row.
Next Row (Buttonhole Row): K2, yarn over, knit 2 sts together, k to end of row.
Next 7 Rows: Knit.
Next Row: Rep Buttonhole Row.
Next Row: Knit.
Shape Neck
Next Row (RS):
Bind off 8 (9, 10, 12) sts, k to end of row - 8 sts rem.
Work even in Garter st over rem sts until Right Front measures 9 1/2 in.from beg. Bind off.
Back:
Transfer Back sts from holder to needle. From RS, join yarn and work even in Garter st until Back measures same as Right Front. Bind off.
Left Front:
Transfer Left Front sts from holder to needle. From RS, join yarn and work even in Garter st until Left Front measures 9 in. from beg, end with a RS row.
Shape Neck
Next Row (WS):
Bind off 8sts, k to end of row - 8 sts rem.
Work even in Garter st over rem sts until Left Front measures same as Back. Bind off.

Sleeve :(make 2)
Cast on 14 sts.
Work 4 rows in Garter st.
Next (Inc) Row: K1, kfb, k to last 2 sts, kfb, k1 - 16 sts at end of row.
Rep last 5 rows 6 more times - 28 sts when all incs complete.
Work even in Garter st until Sleeve measures 6 in. from beg. Bind off.

Hoodie:
Cast on 45 sts.
Work in Garter st until piece measures 6 in.from beg. Bind off.

FINISHING
Sew shoulder seams. Sew in Sleeves. Sew Sleeve seams. Fold Hood in half and seam bound-off edge for top of Hood. Sew Hood to neck edge. Sew buttons to Left Front, opposite buttonholes. Weave in ends.

Sunday, July 17, 2011

Crochet Sandels!!


These sandels are made for babies from 0 to 3 month...

Insructions:
FPdc =To make Front Post Double Crochet (Fpdc) : Yo and insert hook from the front to the back around the post of the dc on the previous row. Complete as for regular dc.
FPsc =To make Front Post Single Crochet (Fpsc) : Yo and insert hook from the front to the back around the post of the dc on the previous row. Complete as for regular sc.
Ch8
Rnd1: dc in the 2nd chain from the hook, dc all around (6 dc ), 6 dc in the last ch which will form a turn, 5 dc in the other side of the chain ,5dc in the last ch , join with a sl to the 1st dc . [22 dc. ]
Rnd 2 : ch2, dc in the next 7 dc, 2dc in the next st, dc in the next st, 2 dc in the next st, dc in the next st, 2dc in the next st , 6 dc in the next 6dc , 2 dc in the next st, dc in the next st, 2dc in the next st, dc in the last st , join with a sl to the top of the 2 chains. [28 dc]
change color
Rnd 3: ch2, work fpdc all around, join with sl st in the beg st   [28 fpdc.]

Rnd 4 : with MC again work fpsc in all sts around ,join with sl st in the beg st  [28 fpsc.]
The back :
Rnd 1 : ch2, TURN work 7 dc in the next 7 sts, turn. [7dc]
Rnd 2: ch2, hdc in all sts around [7 hdc]. Don't fassten off
The Top part:
Ch11 , sl in the buttum part (in the circle that formed a turn in the 1st rnd ) or in a reasonable place , turn
sl in the 1st 3 chains , ch 8 , join with a sl to the other side of the back , Fassten off, hide all tails


Friday, July 15, 2011

How To Crochet A Dress!!


Instructions:
Reverse sc crochet = working from left to right, insert hook in next st to the right, complete as sc.
Dress Body
Row1: Ch 56, sc in 2nd ch from hook, sc in next 5 ch, 3 sc in next ch, ( forms corner ) * sc in next 13 ch, 3 sc in next ch ( forms corner ); rep from * 2 more times, sc in last 6 ch, turn (63 sts).
Note. Work the fol. rows in Back Loops only unless otherwise stated.
Rows 2-9:  Ch 1, dc in each st across with 3 sc in each centre corner st, turn,
Row 10-11: Ch 1, sc in each st across with 3 sc in each centre corner st, inc 6 sc in each end,turn, ending with 143 sc in last row.
Rows 12:  Ch 1, sc in first 18 sts; for first Armhole, ch 9, skip next 35 sts; sc in next 37 sts; for 2nd Armhole, ch 9, skip next 35 sts; sc in last 18 sts, turn (73 sc, 2 ch - 9 sps)
Row 13: Ch 1, sc in each st and each ch across, turn (91 sc).
Rows 14-19 : Ch 1, sc in each st across. At end of last row, fasten off.
Button whole Row
Row 1 : Working in ends of rows across Left Back, with right side of work facing you, join with sc in first row, sc in each row across, turn (19 sc) .
Row 2: Ch 1, sc in each st across, turn.
Row 3: Ch 1, sc in first 4 sts; for Buttonhole, ch 2, skip next 2 sts, * sc in next 4sts; for Buttonhole, ch 2, skip next 2 sts; rep from * one more time, sc in last st, turn.
Row 4 : Ch 1, sc in each st and 2 sc in each ch 2 sp across, turn (19 sc) .
Row 5: ch 1, sc in each st across, fasten off.
Button Row :
Row 1: Working in ends of rows across Right Back, with right side of work facing you, join with sc in first row, sc in each row across, turn (19) .
Rows 2-5 : Ch 1, sc in each st across, turn. At end of last row, fasten off.
For Necktrim, working in ends of rows across Buttonhole and Button Rows and in starting ch on opposite side of row 1 on Bodice, with right side of work facing you, join with sc in last row on Button row, working from left to right, reverce sc in each row and in each ch across, fasten off.
Skirt:
(worked in Both Loops)
 Rnd1: Working in ends of rows of Button and Buttonhole and on last row of Bodice, hold Buttonhole over Button; matching rows and working through both thicknesses, join with sc in first row, dc in next 2 rows; working on Body only, dc in each st around, join with sl st in first dc (96 sc).
Notes = for beginning V-stitch (beg V-st), ch 5, dc in same st.
for V-stitch (V-st), dc, ch 2, dc) in next st. 
Rnd 2 : Beg. V-st, skip next st, (V-st in next st, skip next st, ) around, join with sl st in 3rd ch of ch 5 (48 V-sts). 
Rnd 3 : Sl st in next ch sp, ch 3, (dc, ch 2, 2 dc) in same space, (2 dc, ch 2, 2 dc) in ch space of each V-st around, join with sl st in top of ch 3. 
Rnd 4-5 : Sl st in next st, sl st in next ch sp, ch 3, ( dc, ch 2, 2 dc) in same space, (2 dc, ch 2, 2 dc ) in each ch sp around, join. 
Rnd 6 : : Sl st in next st, sl st in next ch sp, ch 3, ( 2 dc, ch 2, 3 dc ) in same sp, ( 3 dc, ch 2, 3 dc) in each ch sp around, join. 
Rnd 7-12: Sl st in each of next 2 sts, sl st in next ch sp, ch 3, ( 2 dc, ch 2, 3 dc ) in same sp, ( 3 dc, ch 2, 3 dc ) in each ch sp around, join. 
Rnd 13 :Sl st in each of next 2 sts, sl st in next ch sp, ch 3, 7 dc in same sp; for Scallop, 8 dc in each ch sp around, join.
Rnd 14 : Sl st in next 4 sts, 9 dc in sp between last Scallop and next Scallop, (sl st in 5th dc of next Scallop, 9 dc in sp between last Scallop and next Scallop) around, join with sl st in first sl st, fasten off.
Sew buttons to Button row opposite Buttonholes.Attach the flower in the olace you feel comfortable to.
Add a ribbon in the last row of the dc.

Wednesday, June 29, 2011

How To Crochet A Bag !!!


Pattern :
Ch 3, join with sl st to form a ring.
Rnd 1: Ch 3 (counts as first dc here and throughout), work 11 more dc in ring; join with sl st in sp between beg ch and next dc (12 dc).
Rnd 2: Ch 3, turn, dc in same sp as join, *2 dc in next sp between sts; rep from * around; join with sl st in sp between beg ch and next dc ( 24 dc).
Rnd 3: Ch 3, turn, dc in same sp as join, dc in next sp between sts, *2 dc in next sp between sts, dc in next sp between sts; rep from * around; join with sl st in sp between beg ch and next dc ( 36dc).
Rnd 4: Ch 3, turn, dc in same sp as join, dc in next 2 sps between sts, *2 dc in next sp between sts, dc in next 2 sps between sts; rep from * around; join with sl st in sp between beg ch and next dc ( 48 dc).
Rnd 5: Ch 3, turn, dc in same sp as join, dc in next 3 sps between sts, *2 dc in next sp between sts, dc in next 3 sps between sts; rep from * around; join with sl st in sp between beg ch and next dc (60 dc)
Rnd 6: Ch 3, turn, dc in each sp around; join with sl st in sp between beg ch and next dc.
Rnd 7: Ch 3, turn, dc in same sp as join, dc in next 4 sps between sts, *2 dc in next sp between sts, dc in next 4 sps between sts; rep from * around; join with sl st in sp between beg ch and next dc (72 dc).
Rnd 8: Ch 3, turn, dc in same sp as join, dc in next 7 sps between sts, *2 dc in next sp between sts, dc in next 7 sps between sts; rep from * around; join with sl st in sp between beg ch and next dc(81 dc).
Rnd 9: Ch 3, turn, dc in same sp as join, dc in next 8 sps between sts, *2 dc in next sp between sts, dc in next 8 sps between sts; rep from * around; join with sl st in sp between beg ch and next dc ( 90 dc).
Rnd 10: Ch 3, turn, dc in same sp as join, dc in next 9 sps between sts, *2 dc in next sp between sts, dc in next 9 sps between sts; rep from * around; join with sl st in sp between beg ch and next dc ( 99 dc).
Rnd 11: Rep Rnd 6.
Rnd 12: Ch 3, turn, dc in same sp as join, dc in next 10 sps between sts, *2 dc in next sp between sts, dc in next 10 sps between sts; rep from * around; join with sl st in sp between beg ch and next dc (108 dc).
Rnd 13: Ch 3, turn, dc in same sp as join, dc in next 17 sps between sts, *2 dc in next sp between sts, dc in next 17 sps between sts; rep from * around; join with sl st in sp between beg ch and next dc (114 dc).
Rnd 14: Ch 3, turn, dc in same sp as join, dc in next 18 sps between sts, *2 dc in next sp between sts, dc in next 18 sps between sts; rep from * around; join with sl st in sp between beg ch and next dc (120 dc).
Rnds 15-28: Rep Rnd 6.
Rnd 29: Ch 3, turn, dc in next 7 sps between sts, dc2tog, *dc in next 8 sps between sts, dc2tog; repeat from * around; join with sl st in sp between beg ch and next dc (108 dc).
Rnd 30: Rep Rnd 6.
Rnd 31: Ch 3, turn, dc in next 3 sps between sts, dc2tog, *dc in next 4 sps between sts, dc2tog; repeat from * around; join with sl st in sp between beg ch and next dc ( 90 dc).
Rnd 32: Rep Rnd 6. Do not fasten off.
Shape handle
Row 33:
Ch 3, dc2tog, dc in next 29 sps, dc2tog, dc in next sp; leave remaining sts unworked (33 sts).
Rows 34-45: Ch 3, turn, dc2tog, dc in each sp across to last 3 sps, dc2tog, dc in next sp – 9 sts at end of Row 45.
Rows 46-56: Ch 3, turn, dc in each sp across ( 9 sts). Fasten off at end of Row 56.
Sk 10 sps from last st worked on Rnd 32. Join yarn with sl st in next sp, ch 3 and work same as for first half of handle. Do not fasten off. From wrong side, sc ends of handle tog.
LID:
ch 11 , dc in the 2nd ch from hook and all around (10 dc )
work even in dc till piece measures 6 in from beg
Next rnd : ch2, dc in the first 4 sts , ch2 , skip next 2 sts , 4 dc in the next sts ,
next rnd : ch2, dc all around , Fasten off
FINISHING
From right side, sc evenly around edges of handle.
attach button to on of the bag sides , sew lid on the other side . weave all ends.


Monday, June 20, 2011

My Fafourite baby Blanket !!!


Pattern :

ch 119 , or more whatever length you prefer but just make it odd number
1st rnd :  dc in the 3rd ch from the hook , dc all around ( 118 dc ).
2nd rnd : ch 2, dc in the first 2 dc , v -stitch all around , dc in the last 2 dc
3rd rnd : ch2 , dc in the first 2 dc , clusters in the v-stitch space all around , 2 dc in last 2 dc .
4th rnd : ch1 , with another colour- (pink or we can call it A) or the same color whatever you prefer - sc in all sts  around .
5th rnd : ch 1 , sc in all sts around , cut yarn , back to main color
repeat these rnds till pice measures 30 inches or whatever lenght you like ...., DON'T Fassten OFF
Edging :
1st rnd : with pink or A sc around all 4 edges of the blanket working evenly on each side , 3 sc on each corner
2nd rnd: with Main color, ch2 , 2 dc on each sc around . cut the yarn .
3rd rnd : with pink or A , sc on each dc around , Fastten off , Hide all tails

Sunday, June 19, 2011

How to make a flower !!!


To make  a flower is really easy , and you can attach it to anything you want , your bag , your jacket , your scarf , ..........etc or you can wear it in your hand or as a head band ....

           ch4 , join with sl to first ch , to form a ring
Inside the ring 
1st rnd : (sc , ch 3 )5 times to form 5 petals or loops
2nd rnd: 5 dc in each petal or loop , ending with a sl on each sc acroos
3rd rnd : sc in the back of the petal , ch 3 , sc in the back of each petal around , join with a sl st .( 5 more loops )
4th rnd : sc , hdc , dc , tc , dc , sc , sl st  on each loop around ( 5 times )
attach the yarn to center of the flower , Fassten off